Information for upper limb amputees and their families
The most important goal of your entire treatment—from surgery to rehabilitation, to the fitting of your prosthesis—is to help you attain the most function and mobility possible, so you can lead an active life.
Your therapy team, which includes your doctors, therapists, prosthetists—and of course, you and your loved ones—will help you achieve the most independence possible. On average, this rehabilitation process takes between two to six months, although this can be affected by various factors, including your level of motivation and how well your prosthesis fits.
Recommendations with regard to your therapy and rehabilitation are provided below. However, the instructions from your rehabilitation team always take priority since this team is best able to evaluate your individual situation.
Before amputation
Whether you’ve known about your amputation surgery for a while, or just found out, remember that you’re not alone. Your treatment team is there to support you, answer question—and find the best solutions for you.

Initial examinations
If you are to undergo planned amputation surgery, you will be examined in detail several times before the surgery. Your doctors will explain what will happen both during and after the operation. Of course, if you’ve had a traumatic accident, your conversations will occur after the surgery.
During these discussions, you have the opportunity to ask any questions which are important to you. It’s a good idea to take notes of what you want to ask the doctor before the discussions so that you don't forget anything. Remember that it’s their job to explain it all clearly to you.

Targeted preparation
If possible, you should begin doing those therapy exercises you’ll use after amputation surgery before your surgery takes place. That way you can prepare your muscles in advance and hopefully make your recovery that much easier on you.

Psychological support
An amputation is a big change in your life and it may be helpful to get psychological counseling. Counseling can help you work through any issues or fears you may have, while taking some of the weight off of your friends and family—and yourself.

Talking to other amputees
We recommend that you talk with peers who have also undergone amputation surgery. It’s good to hear how others deal with the situation, and in many cases they’ll also be able to share tips on everything from using your prosthesis to getting the right fit. Talk to your therapy team about how best to get in contact with peer support groups. Or visit Amputee Coalition.
Amputation
Find out more about what ‘amputation’ means, including types of amputation and possible causes.

What does ‘amputation’ mean, and why is it done?
Amputation is described as the separation of a bone in healthy tissue or the removal of a limb at a joint (exarticulation).
Amputation surgery may be necessary if an injured or diseased limb is not expected to heal and if your life is endangered as a result. Possible causes include circulation issues, infections, accidents, cancer, or a congenital malformation of the limb. In these cases, it is usually known well in advance that an amputation will become necessary. However, it is sometimes necessary to amputate unexpectedly, for example, due to a severe injury after an accident.

What does ‘amputation level’ mean?
The term amputation level is used to describe the location at which the body part is amputated.
The amputation level is determined by the doctor before the operation and is based on the reason for the amputation. For planned interventions, a prosthetist is normally consulted as well in order to clarify which amputation level is suitable for subsequent fitting of the prosthesis.

Metacarpal amputation
There are many different amputation levels in the hand. They range from a digit or finger amputation, to a metacarpal amputation through the bones of the hand.
When there is less need for—or difficulty in fitting—a prosthesis that offers increased function, Cosmetic silicone prostheses are sometimes used. However, a prosthesis not always used with hand

Wrist disarticulation
For transcarpal (also known as ‘Below elbow’) amputations, the amputation occurs through the radius and the metacarpal bones.
The prosthesis consists of a socket, which contains the residual limb (the amputated limb, colloquially referred to as the ‘stump’), and a terminal device, which can be a hand, a hook or a Greifer. The system will also include adapters and other connecting elements. A prosthesis can be disguised with a cosmetic cover so that it is hardly noticeable visually.

Transradial Amputation
For transradial (also known as ‘below elbow’) amputations, the amputation occurs through the radius and ulna of the lower arm.
The transradial prosthesis consists of a socket, which contains the residual limb (the amputated limb, colloquially referred to as the ‘stump’), the prosthetic wrist, and a terminal device, which can be a hand, a hook or a Greifer. The system will also include adapters and other connecting elements. A prosthesis can be disguised with a cosmetic cover so that it is hardly noticeable visually.

Elbow disarticulation
In elbow disarticulation surgery the elbow joint is separated and the lower arm is removed. The entire upper arm (the humerus) is maintained.
The prosthesis consists of a socket, which contains the residual limb (the amputated limb, colloquially referred to as the ‘stump’), a prosthetic elbow joint, a prosthetic wrist a terminal device, which can be a hand, a hook or a Greifer. The system will also include adapters and other connecting elements. A prosthesis can be disguised with a cosmetic cover so that it is hardly noticeable visually.
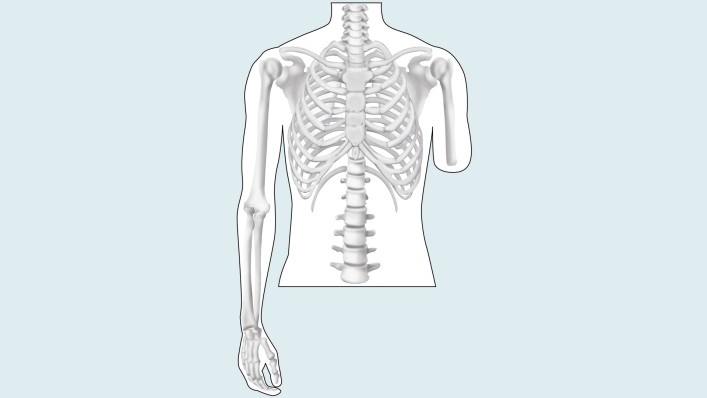
Transhumeral amputation
In a transhumeral amputation (also known as ‘above the elbow’), the amputation occurs through the upper arm bone (the humerus) , so that the elbow is no longer present.
The prosthesis consists of a socket, which contains the residual limb (the amputated limb, colloquially referred to as the ‘stump’), a prosthetic elbow joint, a prosthetic wrist joint, and a terminal device, which can be a hand, a hook or a Greifer. The system will also include adapters and other connecting elements. A prosthesis can be disguised with a cosmetic cover so that it is hardly noticeable visually.

Shoulder disarticulation
With a shoulder disarticulation, the amputation is performed where the upper arm bone (humerus) meets the rest of the shoulder (clavicle and scapula).
The prosthesis consists of a socket, which contains the residuum (in this case the scapula and clavicle and upper portion of the trunk), a prosthetic shoulder joint, a prosthetic elbow joint, a prosthetic wrist joint, and a terminal device, which can be a hand, a hook or a Greifer. The system will also include adapters and other connecting elements. A prosthesis can be disguised with a cosmetic cover so that it is hardly noticeable visually.

Forequarter (or ‘Intrascapular Thoracic’) amputation
With a forequarter amputation, the upper arm bone (humerus) scapula, and clavicle, are all removed.
The prosthesis consists of a socket, which contains the residuum (in this case the upper portion of the trunk, including the ribs), a prosthetic shoulder joint, a prosthetic elbow joint, a prosthetic wrist joint, and a terminal device, which can be a hand, a hook or a Greifer. The system will also include adapters and other connecting elements. A prosthesis can be disguised with a cosmetic cover so that it is hardly noticeable visually.
After amputation
After the amputation
Immediately after your operation, the focus will be on your recovery and the healing of your arm, also referred to as your residual limb. A healthy recovery is important so that you can start rehabilitation soon and be fitted with a prosthesis.
Your treatment team will decide when you can start with intensive rehabilitation based on how your recovery is going. During your rehabilitation process, you’ll be fit with a prosthesis tailored to your specific needs, and supported by a rehabilitation team that could include physicians, physical therapists and occupational therapists, a prosthetist and nursing staff. These professionals are there to support you and to ensure that you are well prepared. During rehabilitation you will learn how to properly care for your residual limb, as well as the rest of your body.
Before you can wear a prosthesis, your residual limb must be healed and have attained the proper shape. This means that all fluids that accumulated due to the operation have been removed through compression therapy and that the residual limb edema has subsided.

What to expect after an amputation surgery
When you wake up from the anesthesia, your arm will have likely been treated with simple bandages with a small drainage tube leading out of it. This tube was laid into the wound during the operation so that wound seepage and blood can flow out of the wound, and will be removed from the wound during the healing process.
In most cases the amputation wound closes and forms a scar within the first three to four weeks. But even if the scar looks like it has healed well from the outside and only the color of the scar tissue is changing slightly, complete healing of the scar may take significantly longer.
During this period compression therapy and skin care creams are enormously important in helping the scar tissue remain soft and pliable—while simultaneously making it stable enough to wear a prosthesis.

Correct Positioning
Even during your initial recovery in the hospital bed, it’s important that you maintain the correct body posture so that your muscles and joints do not shorten or stiffen – which could prevent full use of your joints. While most patients initially assume a comfortable, pain-free position, experience has shown this is not al¬ways ideal.
In fact, the residual limb should be extended as much as possible—and under no circumstances should it be elevated for an extended period of time (such as on a cushion) because the muscles may shorten and residual limb mobility may be reduced.

Compression Therapy
With the aid of pressure applied to the residual limb over a large surface area, swelling (edema) of the residual limb can be reduced and the residual limb can be formed for the future prosthetic fitting. This compression of the residual limb contributes to being able to do your prosthetic fitting as soon as possible and to making it easier to adjust your prosthesis. In addition, compression aids circulation in the residual limb. This reduces the amount of pain and results in improved healing of the scar.
Various techniques are used for compression therapy: The residual limb may be wrapped with an elastic bandage, or compression socks or a prefabricated silicone liner may be worn.

Compression Bandaging
Elastic bandages are applied using a special wrapping technique after the wound bandage or residual limb cast, is removed. During the first few days and weeks after the operation, your residual limb will be bandaged by your therapist or by the nursing staff. This somewhat elaborate compression involving elastic bandages can be customized to your individual residual limb amputation level.
The bandage will be removed frequently (initially as often as every half hour) in order to make sure the residual limb was not wrapped too tightly or too loosely. The caregiver will also check to see how the residual limb is developing, whether the edema is getting better, and how the scar is healing. After your limb has healed sufficiently, the compression bandage may only be worn for several hours at a time, for example, before and after wearing an interim prosthesis.

Later on, your caregivers can show you how to apply the compression bandage yourself. Make sure you have the wrapping process explained to you in detail in order to avoid mistakes which could lead to renewed swelling of the residual limb, or to irritation or injury made by folds in the bandage or wrapping that’s too tight. To avoid injurying your sensitive residual limb, use tape on the bandages instead of metal clips.
It is also important that you clean the bandages thoroughly. Since the bandages absorb sweat, they should be washed daily with a mild detergent or a mild soap. Remove the majority of the water by rolling them up gently in a towel, then lay them out flat to dry. Do not hang the bandages up to dry, as this can affect their elasticity.

You have to wear your compression bandages until your residual limb is fully healed. As soon as everything has healed, you can try sleeping through a night without wearing the bandage, but only after consultation with your doctor, prosthetist, or physical therapist. However, if you experience a lot of swelling in the residual limb the next morning, you should continue with the compression therapy.
Residual limb compression socks
Compression socks can also be used instead of bandages. The socks are elastic and available in various sizes. Custom sizes can also be made if the standard sizes do not fit you. Like elastic bandages, the socks must be washed daily and laid out to dry so that they do not lose their elasticity.
Silicone Liners
In addition to elastic bandages and residual limb socks, silicone liners offer a further method for achieving compression. Similar to residual limb socks, silicone liners are available in standard sizes as well as customized fabrications. The liner exerts even pressure on your residual limb and forms it properly. In addition, the flexible, skin-friendly silicone can help make the scar soft and pliable.
To put the liner on, it is best to first turn it inside out and then roll it evenly onto your residual limb. Don’t pull it up like a sock, and take special care to ensure that no folds or air pockets form.
Clean your liner daily with a skin-friendly, unscented soap and warm water. If you sweat a lot, you should clean it several times a day and possibly use a disinfectant. Have your prosthetist explain the care of your liner in detail and follow directions in your user’s manual.Caring for your skin

Caring for your skin
Your therapist will show you how to properly care for your residual limb. In order to prevent the skin from becoming rough and scaly, wash the residual limb with warm water and a mild soap (such as Derma Clean) every morning and evening. Then dry the skin thoroughly or carefully dab it dry and put cream on it. Derma Repair and Derma Prevent, two products from Ottobock, were developed specifically to care for highly stressed skin such as that on a residual limb. The Derma Prevent cream, for example, guards against chafing by covering the skin like a protective film keeping it soft and pliable.
If folds of skin or retracted scars, also known as invaginations, have formed on the residual limb, they must receive particularly intensive care in order to prevent infections. Have your rehabilitation team advise you in this regard. In addition, look out for injuries, pressure sores, and blisters while you care for your residual limb. These must receive medical treatment. A mirror can help you look at the back of your residual limb. Regular massaging and careful stretching of the scar is another important component of residual limb care.
Also note that putting the prosthesis on in the morning right after you wash is often more difficult than usual, since warm water causes the skin on the residual limb to swell.

Desensitizing the skin
The skin on the residual limb is often very sensitive following the surgery. There are ways to reduce these sensations: Take a soft brush or porcupine massage ball and use it to brush or tap the sensi¬tive area (Figure 1, 2). This decreases sensitivity. You can also rub down the residual limb with a rough towel or washcloth (Figure 3).
Only use materials that you are comfortable with, and work from the end of the residual limb to-wards the body.
Residual limb hygiene is also very important fol¬lowing wound healing. The residual limb must be washed daily using water and unscented skin-friendly soap. Ottobock care products can make residual limb care and cleaning easier (Figure 4).

Scar Treatment
In most cases, the surgical wound closes within the first three to four weeks and a scar is formed. Even if the scar appears to have healed well from the outside and the appearance of the scar tissue appears to remain constant, the overall scar heal¬ing process can take much longer. It can take up to 18 months for the wound to heal completely un¬derneath the skin.
You should moisturise your scar regularly from soon after the surgery as scar tissue lacks the ability to produce its own oils. Unscented creams are highly recommended. Such intensive care is important in order to ensure that the scar tissue remains soft and elastic while simultaneously be-coming resilient. This is required so that you will be able to wear the prosthesis, since proper care prevents residual limb pain from developing in the prosthetic socket during movement.
Early compression therapy is also important to affect scar formation. Full-coverage compression combined with a silicone interface is the best way to prevent the development of excessive scar tissue.
Phantom limb pain or sensitivity
position of the missing body part. These sensations are not generally indicative of other problems and usually disappear within a month.
A small number of patients suffer for a longer period of time from phantom limb pain, and there are several methods for treating this pain. Surgery is sometimes used to shorten nerves and blood vessels that may be too long and riding on bone. There are also therapies that involve blocking the pain. For less invasive techniques, bandaging the limb with mild compression often alleviates phantom pain, as can wearing a prosthesis.
Finally, mirror therapy has also been found to be helpful. With mirror therapy, the amputee uses a mirror between their legs or arms so that they only see their sound limb. They then move their sound side while also imagining that they are moving their amputated side. Physicians are not sure why this ‘reimagining’ the residual limb works, but the therapy has proven successful with many amputees.

Preparatory therapy exercises following surgery
In order for your body to be well prepared for the next treatment steps and so that you remain mobile, exercises to stretch and strengthen the trunk, arm, and leg muscles are highly recommended. Have your physical therapist show you exercises which support your recovery and also train the joints near the amputation location as much as possible.

Stretching the Residual Limb Musculature
The muscles and joints around your residual limb – for example the shoulder joint – need stretching. If you have trouble moving these joints actively, it is possible to use a towel to passively stretch them. It’s important that you maintain or regain maximum joint mobility.

Improving the Dexterity of the Sound Side
Training of the sound side follows, depending on whether your dominant hand or the opposite hand was affected. Fine motor skills, dexterity and strength training will be practiced. The more capable you are with your sound hand, the better you’ll be able to perform Activities of Daily Living and take care of yourself. It’s important to practice challeng¬ing activities such as writing or brushing your teeth.

Muscle Strengthening of the Torso
Because the loss of a limb also causes the loss of weight on the amputated side—which can lead to imbalance and poor posture—it’s important to pay special attention to keeping your torso in balance and maintaining a healthy back. Back exercises can aid in this maintenance. Special attention to these things before the prosthetic fitting can prevent the development of any malpositions and make it easier to transition to using your prosthesis.
Once you start wearing the prosthesis, its weight compensates for the loss of mass. If malpositions have already developed, special exercises can be used to correct this or prevent further progression. A stable and balanced torso will make it easier to control your prosthesis.
Rehabilitation
The rehabilitation process
Once your residual limb has been properly formed you’ll learn more about your prosthesis. You’ll be instructed in how to take care of it as well as your residual limb, and you’ll also begin training with it.
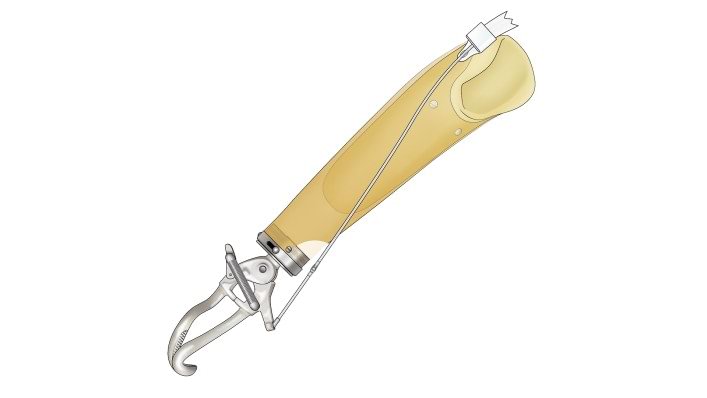
Prosthetic Devices
There are three main types of upper limb prosthetic fittings: body-powered, myoelectric and hybrid, which is a combination of the other two.
Body-powered systems use a harness with cables to move the prosthesis. By engaging larger muscles, the cables can open and close a hook or hand, as well as an elbow or shoulder joint.

With myoelectric systems, the prosthesis actually takes advantage of the natural signals that your muscles generate when they are used. Small sensors, known as electrodes, measure and amplify these muscle (or ‘myoelectric’) signals and are used to activate various functions of the prosthesis, such as opening or closing the hand. Batteries are used to power the motors that make these movements.
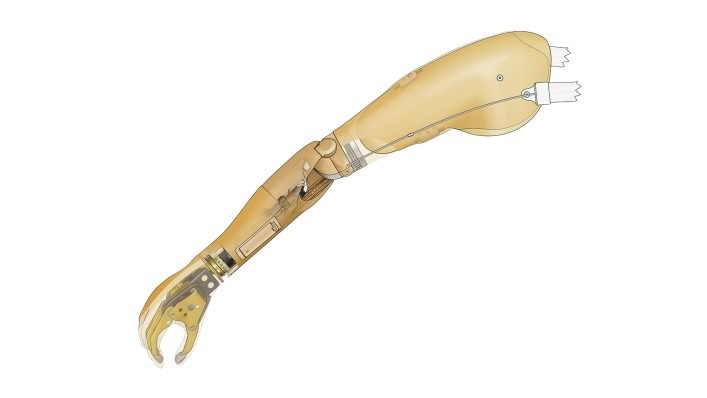
Hybrid systems take advantage of both systems. A hybrid system may have a myoelectrically controlled hand and wrist, with a body-powered elbow joint.
Each system has its own advantages and disadvantages. Myoelectic systems have the advantage of using the remnant muscles originally used, for example, for opening and closing the hand, while body-powered systems have to use muscle groups that were not originally intended for those actions. Myoelectric systems may also look more cosmetic—with that trade-off that it may not be as rugged as a body-powered system.
Your prosthetist will talk to your about your goals and needs and will help you determine which solution will be best for your needs.

The prosthetic fitting
You’ll be fit with your new prosthesis once your residual limb has healed and has stabilized in its size. This usually takes from four to six weeks after the surgery.
During your first fitting visit with your prosthetic team, they will make a cast of your residual limb with plaster so that they have an exact replica of your limb. This will be used to make a test socket. The test socket is an interim socket that allows your team to customize the fit of your prosthesis and is generally made from a clear thermoplastic. The material is easily reformed to get an intimate fit, and, because it is transparent, shows where your skin is coming in contact with the socket.
Socket fit is very important. Think of it as a shoe: if it doesn’t fit well, you can’t walk well—no matter how many socks you wear. Once the socket as been customized for your unique anatomy, a definitive socket will be fabricated from lightweight thermoplastic or carbon fiber. The prosthetic components are then attached to this socket.
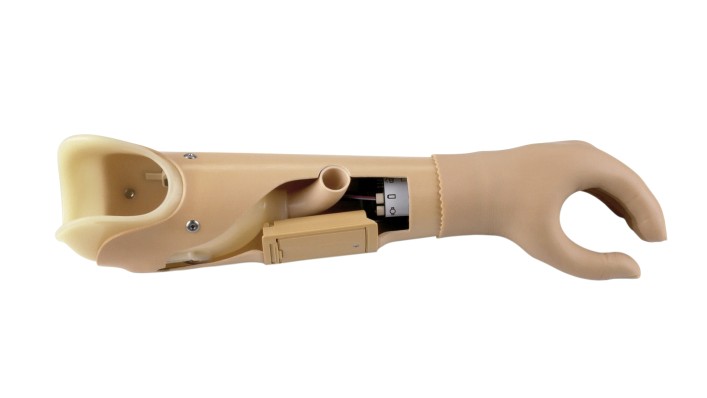
Training to use your prosthesis
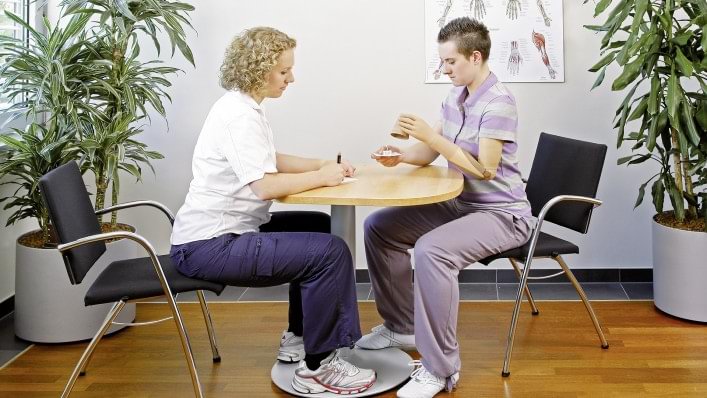
The goal of rehabilitation training with a physical therapist is to help you gain as much mobility and independence as possible.
Your therapist will help you learn how to use and care for your prosthesis properly, including how to put the prosthesis on and taking it off. Then you’ll begin controls training, repetitive drills, and finally, Activities of Daily Living (ADLs).

Putting on and taking off your prosthesis
Correctly putting your prosthesis on (donning) and taking it off (doffing) by yourself is an important everyday task. Your family or friends may need to help you initially, but the goal is for you to ultimately be able to do this on your own.
There are different ways to put your prosthesis depending on the type of prosthesis you have and the condition of your residual limb. Your therapist will show you which ones are suitable for you.

Caring for your prosthesis
cleaned every day, too. Wipe the inside of the socket with a moist cloth to remove sweat residue and skin particles.
Keeping the contact surface with the skin clean helps to avoid skin irritation. If you wear a liner, please care for it daily according to the user manual.
Finally, if you have a myoelectric system, you’ll likely have to charge the batteries daily.

Controls Training
Depending on the components used in your prosthesis, controls training will teach you how to open and close your terminal device or hand, rotate it internally and externally, and, in case of higher level amputations, how to flex or extend the elbow and shoulder. Think of controls training as learning about all the controls for driving a car—without really driving yet.

Repetitive Drills
Repetitive drills is where you begin to practice ‘driving the car’. You’ll practice making specific movement patterns. The more you practice the better you’ll get at remaining relaxed while performing the movements, and the more auto¬mated the movements will become. With enough repetition, you’ll be able to simply make a movement, instead of thinking about it.
Suitable exercise accessories include cones, vari¬ous peg board games or a pinch tree with indi¬vidual pegs (Figure 1), which are changed in their vertical or horizontal positions. This means you have to purposefully rotate and grip with your prosthetic hand.
Activities of Daily Living (ADLs) and Everyday Training


OK, now you’ve got your ‘driver’s license’, so to speak. After the repetitive drills, you’ll be ready for more complex movements that you’ll encounter in everyday life. Your therapist may tailor this training you your personal goals and needs, depending on your day-to-day life and occupation.
You may begin with simpler activities such as folding a towel, and then work your way up to things such as preparing a complete meal and eating it with a knife and fork (Fig¬ure 3). ADL training may also include getting dressed and undressed; opening a bottle and pouring a drink; and using a computer and office tools.
Additional Therapeutic Measures
Assistive Device Consulting
If you experience difficulties with your new prosthe¬sis while performing certain activities, various as¬sistive devices may be used to increase your inde¬pendence. Your therapist can determine whether this is an option for you.
However, the “less is more” rule applies to all de¬vices; the fewer devices you need, the greater your day-to-day independence. If you use many specialized devices in your home environment, it will be more difficult to function outside the home without those devices.

Leisure and Sports
Of course, it’s also important to be physically fit, and your prosthesis will help you participate in more sports and leisure activities. Talk to your therapist about strategies for getting the most out of your prosthesis.
We hope these pages have provided you with comprehen¬sive information and wish you great success in your rehabilitation. If you have any questions or comments, please contact us at:
Standard contact info to be inserted here.
FAQs
Take a look at our Frequently Asked Questions for more information.
-
If I touch the skin on my residual limb, it feels “strange” there. What can I do about it?
After an amputation, sensitivity problems can occur on the residual limb. These unfamiliar sensations often normalize by themselves after a while. However, you can speed up this process by stroking the skin of your residual limb with a terry towel or a soft brush. Your therapy team will likely have other suggestions about steps you can take.
-
Why can't I get a prosthesis right after the amputation?
Your residual limb is still swollen and the skin is sensitive after the operation. It’s also important that the wound can heal “in peace”. To get into your prosthesis as soon as possible after amputation surgery, work closely with your team and do the rehabilitation exercises consistently.
-
How long will it take before I master the prosthesis completely?
How long you require in order to tap the full potential of your prosthesis depends on many factors, including the reason for the amputation, amputation level, condition of the residual limb, and your overall ability.
Your motivation is also an important factor: If you begin preparing yourself for the prosthetic fitting shortly after the operation and train frequently and intensively with the prosthesis later on, you’ll contribute to reducing the time required to reach your personal goals.
-
Can I go back to work with my prosthesis?
Depending on your occupation, you can go back to work with your prosthesis. If you perform a job that is physically demanding, you should inform your prosthetist before your prosthesis is made, in order to best determine which components might be right for you.
If your work involves extreme physical strain, you should let your prosthetist know before the pros¬thesis is fabricated, because the type of stress applied to the prosthesis affects the manufacturing of the socket, and the selection of components. Various terminal devices, such as the Ottobock System Greifer or Michelangelo Hand are recommended for specific tasks.
-
Can I ride a bicycle?
Your ability to ride your bicycle depends on the amputation level and the type of prosthesis you have. The Axon-Bus prosthetic system was developed for everyday use and must not be used for unusual activities, for example, sports with excessive strain and/or shocks to the wrist unit (pushups, downhill, mountain biking) or extreme sports (free climbing, paragliding, etc.). Always refer to the the Instructions for Use manual before wearing your Michelangelo hand.
-
Can I go swimming with my prosthesis?
Your everyday prosthesis is not suitable for swimming or taking a shower. Talk to your prosthetist about a specialized swimming prosthesis.
-
How long will my prosthesis last? Will I require any new ‘parts’? When will I require a new prosthesis?
In general, if the socket of your prosthesis fits well and you’re not having any difficulties, then you don't require a new prosthesis. You will likely, however, need new liners or limb socks on a regular basis. Talk to your prosthetist about which liners will work best for you and your prosthesis.
Not finding what you are looking for? Please contact us!
Resources
We’ve collected a variety of helpful links if you’d like further information.
Amputee Support Program (includes glossary on insurance options – USA)
Kaiser Family Foundation’s Consumer Guide to Making Health Care Appeals

